After seeing people in the mechanical keyboard community speaking to the merits of split ergonomic keyboards, I wanted to try one out and decided I would build my own. I had several goals for this project and I feel that I more or less accomplished all of them.
My technical goals were to have a fully functional keyboard with some of the most interesting features I saw during my preliminary research. Additionally, I wanted the design to be as simple as possible while still having the necessary features for me to use it on a daily basis. Based on the learning from my previous projects, namely the gesture glove, I committed to following a more rigorous design process than I have in previous personal projects. The key points for me were as follows:
Dooring Event
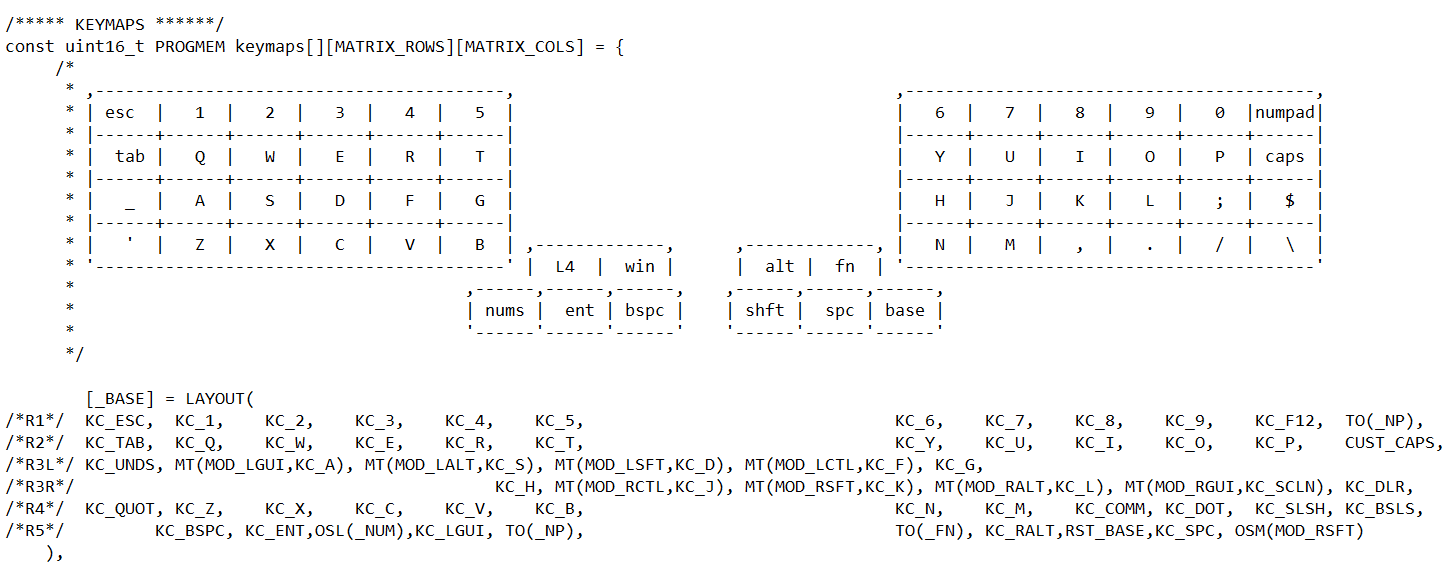
I will discuss some of the most notable features I implemented and will be adding a longer description of the design process and full feature set in the future. The keyboard I designed and 3D printed is a split, column staggered design with two 5 key thumb clusters and a total of 58 keys. It is also hot swappable and features a custom layout I programmed using the Quantum Mechanical Keyboard (QMK) software tools.
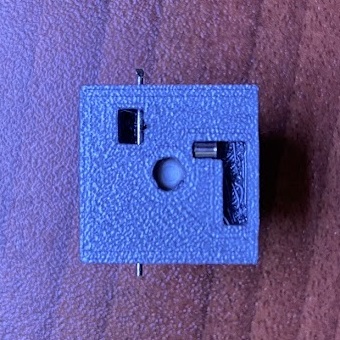
One unique feature I implemented was the hot swappable interface. Although I have some experience with designing circuit boards, I expected that I would need several iterations of the wiring layout and I wanted to be able to do this without paying and waiting for multiple printed circuit boards. The solution I came up with features a metal strip, one end of which is connected to the wiring grid, with the other end accepting the key switch pins.
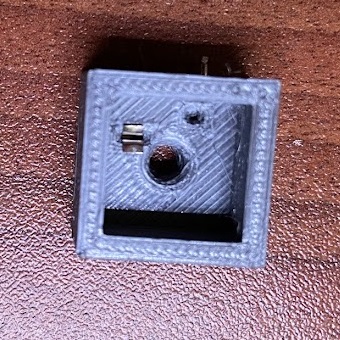
Hot swap socket
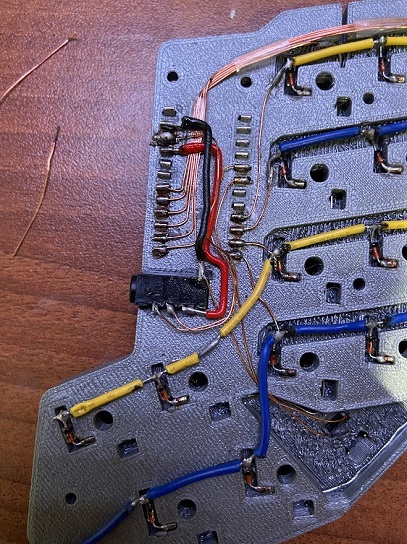
Hot swap wire connections
I succeeded in creating a fully functional keyboard which I now use daily. It was a great learning experience and gave me an opportunity to practice a more rigorous design practice. What I like most about the keyboard is that it feels like I am able to be more consistent with my typing, especially for numbers and special characters which I have programmed to all be in easy physical reach and low number of actions.
There were two big takeaways I had from this project. The first was due to a blunder I made when testing the hot swappable interface for the key switches. I tested whether the interface was electrically connected but did not test if I could consistently produce a reliable connection and whether that connection would remain consistent over time. It in fact was not and this meant I only found out about the flaw in my design after wiring a full half of the keyboard which I then had to scrap. The obvious solution to this is to be more methodical about testing critical features and I definitely plan to implement this in the future.

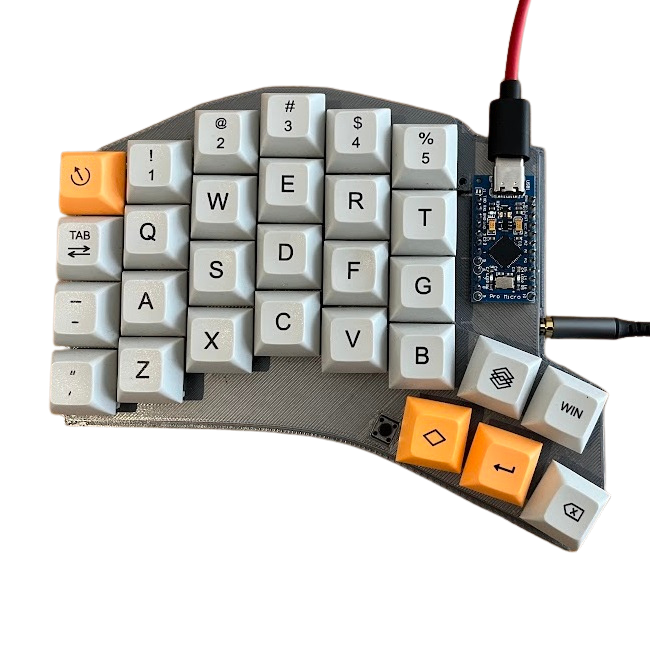
Wiring
Microcontroller wiring
I succeeded in creating a fully functional keyboard which I now use daily. It was a great learning experience and gave me an opportunity to practice a more rigorous design practice. What I like most about the keyboard is that it feels like I am able to be more consistent with my typing, especially for numbers and special characters which I have programmed to all be in easy physical reach and low number of actions.
There were two big takeaways I had from this project. The first was due to a blunder I made when testing the hot swappable interface for the key switches. I tested whether the interface was electrically connected but did not test if I could consistently produce a reliable connection and whether that connection would remain consistent over time. It in fact was not and this meant I only found out about the flaw in my design after wiring a full half of the keyboard which I then had to scrap. The obvious solution to this is to be more methodical about testing critical features and I definitely plan to implement this in the future.
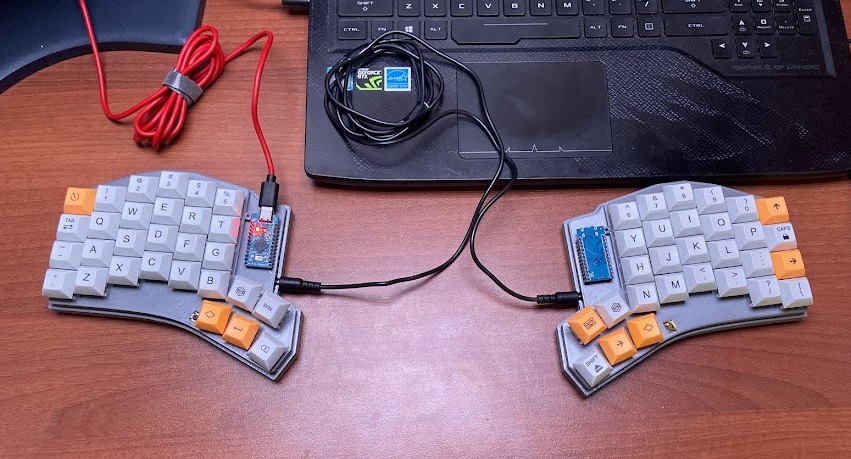
Finished design
The other thing that I took away from this project was the danger of getting sucked into adding more features and further tweaking and customizing. Once I began working on the code for the keyboard, I found a number of great features that I wanted to implement on my keyboard. I found myself in a loop of adding, testing, tweaking, and then adding more features. I was able to halt this at a reasonable level and have resolved to do updates on a batch basis, a method suggested by software developers I follow. This entails freezing the development after achieving the initial goals, then keeping track of desired updates and making them all at once and over a fixed amount of time in the future.
I feel that this project was a great success and I expect it is just the first iteration of a project I will continue to explore in the future.
